
Die-cut vs kiss-cut labels: specify the right format
Choose the delivered format, confirm the cut on the actual material, and give your converter a specification the application team can approve.
THE SHORT ANSWER
A die is a cutting tool; a kiss cut leaves the release liner intact. Specify the delivered format and cut result. For conventional machine-applied roll labels, confirm a continuous liner, matrix removal and the approved roll requirements.
Die-cut is a method; kiss-cut describes the depth
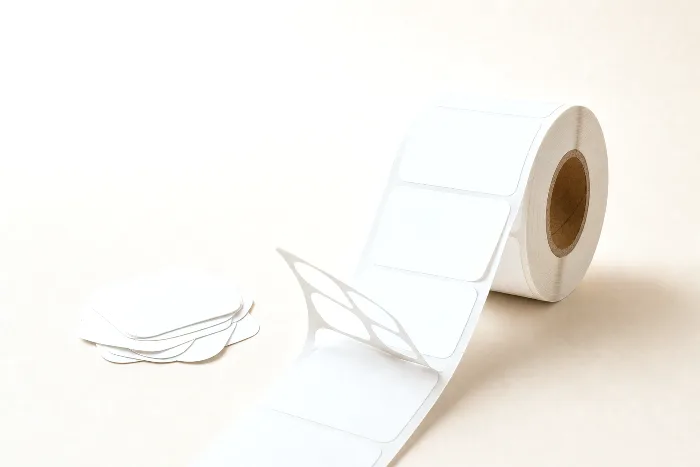
A kiss cut separates the label face and adhesive while leaving the release liner intact. Die-cutting uses a die to make a shape; it can produce a kiss cut or a through cut. In sticker catalogs, “die-cut sticker” often means an individually trimmed piece with the backing cut to the outline. Confirm the delivered format instead of relying on that product name.
For a conventional pressure-sensitive label applicator, specify labels on a continuous liner with the required waste matrix removed. A custom shape does not mean the liner must be cut through. This guide complements the label printing buyer guide.
Separate cutting method from finished format
Rotary and flatbed dies use physical tooling. Digital knife or laser systems follow a programmed path. Equipment, tooling and settings must suit the actual label construction; do not infer the correct depth or production speed from the method name alone.
Ask the converter to confirm clean label separation and the condition of the liner on the proposed material. Cutting too deeply can damage the carrier; incomplete cutting can make labels difficult to separate. The production trial must establish the acceptable result for your job.
Roll labels, sheets and individual stickers
| Delivered format | Specify on the order | Confirm before production |
|---|---|---|
| Conventional roll labels | Labels kiss-cut on a continuous liner; matrix removal requirements | Applicator compatibility, gap, unwind and roll limits |
| Sheet labels | Peelable labels on a finished backing sheet | Sheet dimensions, layout and printing or handling requirements |
| Individually trimmed stickers | Through-cut outer outline, including backing | Backing shape, peel access, packing and quantity |
| Kiss-cut sticker on a larger backing | Label outline and separate backing outline | Which areas peel away and how each piece is delivered |
These are format distinctions, not a statement that every format is available from every supplier. Confirm availability and quote separate components as separate line items.
Agree the matrix removal requirement
The matrix is the unwanted face material surrounding cut labels. Removing it leaves the labels spaced on their carrier. Ask the converter whether the proposed shape, spacing and material can be stripped consistently and whether the finished roll meets the applicator's requirements.
Small details, narrow waste bridges and sharp corners need a manufacturability review. A shape that looks correct on a screen still needs to survive converting and dispensing. Keep any agreed geometry change tied to the artwork revision.
Check the label and liner on the application line
Conventional pressure-sensitive roll applicators use the liner to carry labels through the feed path and present them at the dispense point. Individually trimmed stickers cannot simply replace that roll stock. Specialized linerless systems are a different construction and equipment workflow.
- Confirm liner compatibility, cut quality and consistent label release.
- Approve the gap or sensing arrangement on the actual construction, especially for clear materials.
- Document face-in or face-out winding and the leading artwork edge with the unwind direction guide.
- Use the core and roll diameter checklist for dimensions, count, tolerances and handling limits.
Approve the outline and edge quality
Ask the converter to review corner radius, narrow features and internal cutouts on the selected construction. There is no universal corner radius or minimum feature size suitable for every label. Review a finished sample for edge quality, peeling, waste removal and application.
Use the dieline and bleed guide to keep the cut path separate from printed graphics. Keep critical text and codes within the supplier's approved safe area.
Compare tooling and repeat-order costs
Request tooling, setup, finishing and packing as explicit quote items. An existing die may reduce tooling work, but “standard shape” does not guarantee a free die or a match to your dimensions. Confirm any charge and ownership or storage arrangement in writing.
For each SKU, record the finished dimensions, outline revision and die reference where applicable. Ask what changes on a reorder, when tooling must be replaced, and whether a new material or liner requires requalification. Compare printing plate and tooling costs on the same quantity and release schedule.
A practical cut-format purchasing checklist
- Name the application. Machine-applied product label, hand-applied label or individually handled sticker.
- Define the delivered format. Roll, sheet or individual piece; state what remains on the liner.
- Attach the approved outline. Include dimensions, artwork revision and any separate backing cut.
- Confirm production requirements. Construction, matrix removal, cut quality, roll specification and sample trial.
- Schedule the order. Quantity by SKU, release dates, delivery site and packing requirements.
For enterprise programs, keep this information with the SKU schedule and quote comparison worksheets. Check for artwork, material, supplier or line changes before repeating an order.
Bring the cut specification into a PackOS quote
Start with your artwork or enter known label details manually. Review the proposed dimensions and cut path; an artwork file alone does not establish the physical cutting depth, liner performance or machine compatibility. Share the approved specification with the supplier before production.
Start a label quote or prepare your requirements with the enterprise roll-label buying guide.
Frequently asked questions
Is die-cut the opposite of kiss-cut?
No. Die-cutting describes a cutting method, while kiss-cutting describes a depth that leaves the liner intact. A die can make a kiss cut. Sticker catalogs may use die-cut to mean an individually through-cut piece; confirm the finished format.
Can custom-shaped labels be supplied on rolls?
Yes, subject to the converter approving the shape, construction and spacing. Specify labels on a continuous liner with the required matrix removed and the roll configuration approved for your applicator.
Which cut should I specify for machine-applied labels?
For a conventional pressure-sensitive roll applicator, specify kiss-cut labels on a continuous liner. Confirm cut quality, release, sensing, spacing and roll requirements with the converter and operator. Linerless systems need a separate specification.
Is a kiss-cut sticker lower quality?
Cut depth alone does not determine quality. Compare the material, print, finish, edge quality and performance in the intended use. The format should suit how the label will be handled and applied.
What is matrix stripping?
Matrix stripping removes unwanted face material around the cut labels. Agree the removal requirement and have the converter review the shape and spacing for reliable converting and dispensing.
Are standard dies free on label orders?
Do not assume so. Ask whether a suitable die already exists and request tooling, setup and repeat-order charges in writing. Confirm the dimensions and construction before accepting a stock die.
Can artwork confirm the physical cut depth?
No. Artwork can describe the outline and dimensions, but the converter must set and qualify the physical cut on the selected construction. Approve the finished sample and application requirements separately.